Google Advertising
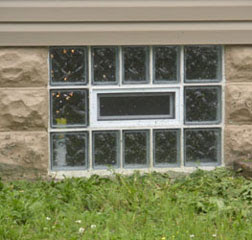
Installation of glass block basement windows looks pretty like taking a few blocks, joining them together with mortar and removing the frame to insert them into the opening. Of course it’s that simple only if a skilled person equipped with the required tools does the job. But if you decide to do it, you have to proceed in a definite sequential order for a successful installation of basement windows. Here are those seven steps forming the sequence of doing the job right in the first go itself.
Step 1 – Find out what the foundation is made of and take its size. Usually foundations have masonry openings made by poured concrete or concrete blocks or at times wood frame opening that is more frequent with walk out basements when the lower level is above the ground level of the land surrounding it. Masonry openings should be measured from the top of the sill to the bottom of the header, whereas in case of a frame opening measure the area that will be available after the window sashes would be removed.
Step 2 – Assess the requirements of glass block air vents and a dryer vent. It always helps to have of maximize air flow to facilitate ventilation and thus prevent formation of mold. Vinyl framed energy efficient air vents may be included to have an operable window inside a secure glass block panel. Other options include fully removable sash windows and exhaust power fans.
Step 3 - Block windows come in different designs, colors, styles and even the tinted ones. Take your time deciding what looks best with your kind of space and matches your style. Moreover, the faces of these blocks may be etched with personalized images or stock patterns to match your personal style and interest.
Step 4 - Order the prefabricated glass block panel with mortar or silicone joints. Prefabricated block window assemblies save a lot of time, money, and give better finish.
The choice of joints is a matter of personal choice and the process employed for finishing of windows enabling their perfect fitting in the window openings. The main benefit of mortar joints is that they allow adjustment of the size of the joint and their traditional look that very well matches the brick veneer and block basements. On the other hand, silicone joints offer the advantage of being put to tighter fitting openings and give the looks of an all glass panel. If you are unable to decide what type will best suit you, it will be good to contact a block specialty window fabricator with the dimensions of your openings and seek recommendations of the best jointing process.
Step 5 - Take out the old window sash and/or frame. In case of masonry basement windows take out the window sash along with its frame. The easiest way to do it is to remove the sash first followed by collapsing, cutting or grinding out the old frame with a pry bar, saw, or grinder. In case of frame openings most often you need to remove the sash only.
Step 6 - Using a plumb adjust the correct level of the window and securely wedge it in the opening. Position the window in the opening, ensuring correct location with the help of a level. Then, using a wood window wedge position the pre-made panel in place.
Step 7 - Secure and seal the window into place. Masonry openings are filled by using pre-mixed glass block mortar mix that comes in 50 lbs. bags. Using a hoe or trowel the mixture is prepared and the sides, tops and sills are filled by employing a pastry bag or tuck pointing tool. The gaps between the block panel and the window frame are filled with spray foam insulation. Next, you install wood stops around the panel as per requirements, and finally provide aluminum or PVC coated coil stock over the wood framing on the exteriors.
If you don’t feel sure of your tackling installation of glass block basement window, it will be good to seek opinion of a professional.